(German version maybe coming later / deutsche Version folgt eventuell später)
http://workflow.biztalk.net now offers a CTP of BizTalk Workflow Services. Let's look at what that means.
First you should download the latest version of the SDK. Right now this is the file "BizTalk Services SDK Setup 0.12.185.2.exe". Please note that the availability of this site and all sub-sites of biztalk.net is at present not reliable at all. It can be taken down temporarily or even for extended periods of time. Please note that the information in this article is based on a very early pre-release version of something that might become a product. So, by the time you read it, this information may be outdated and plainly wrong.
If you do not have an account for BizTalk Services yet, now is the time to create one. Vista users, I recommend creating an information card. When setting a username/password. I also recommend not setting a password that you really want to be secure. Reason: There will be things like deployment samples where the password will be visible.
Assuming you did that, let's look at the SDK:
To actually see what is happening in the samples, you have to start another sample in
Program Files\Microsoft BizTalk Services SDK\Samples\Communication\ExploringFeatures\ConnectionModes\Multicast. This is the place where you will receive a friendly "Hello" from your workflow via the Internet Service Bus (ISB). Use "watchdog" as your chat session name.
In Program Files\Microsoft BizTalk Services SDK\Samples\Workflow\GettingStarted, you can find a definition of a simple "Cloud" Workflow together with rules.
To get started really quickly, you can look at
Program Files\Microsoft BizTalk Services SDK\Samples\Workflow\ExploringFeatures\CreateWorkflowAPIs.
This sample will, when you start it, ask for your credentials and upload a simple workflow to your BizTalk Services account.
I was a little paranoid, so I blanked out the password (now you know why you should not use a relevant password that you use elsewhere, since you might show this sample to someone and bang - there goes your password) and even the authentication token (even though the latter should not really be necessary... but you never know :) ). When doing that, leave it running for a bit before doing "Press any key to terminate workflow instance".
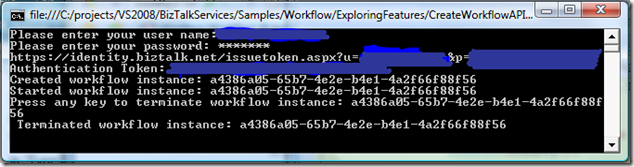
What should happen? Your workflow will start and will try to send a HTTP request to http://www.microsoft.com. If the HTTP-request status is less than 400, then it will send a message to the ISB (to "your" session) that it can reach the Microsoft website. If the site is not responding, then you will receive this information via ISB. The workflow will repeat this procedure every 30 seconds.
Look at the output of your MulticastSample:
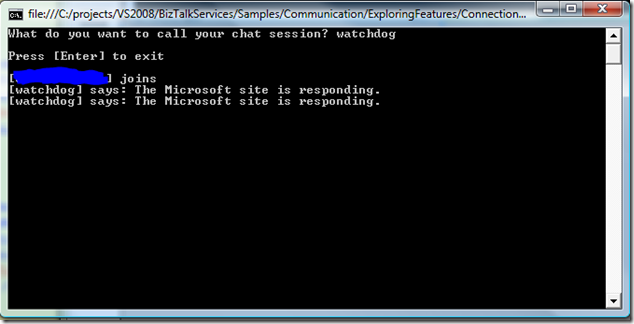
(Again, paranoid me did not want to disclose the chat-name right now)
When setting it up, you should see something like that:
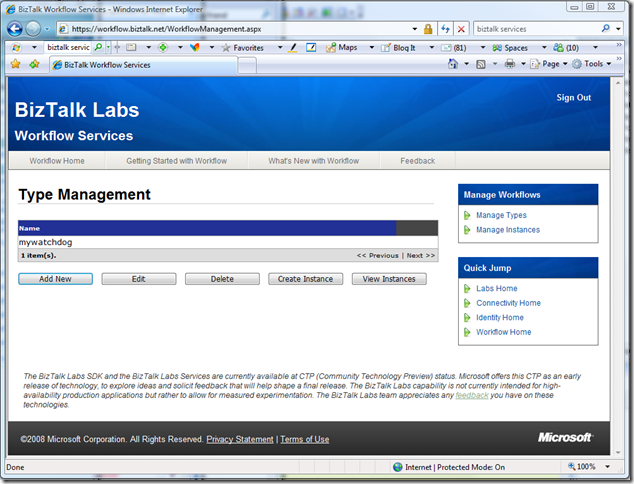
You can also create / edit your workflows online without using Visual Studio. No designer support though right now. So, let's edit this. First click on the line with the name of your workflow type ("mywatchdog" in this case). It will be marked in the browser and then click on "Edit".
(Note that "Add New" is not much different other than that you have to also specify a name for your new workflow type)
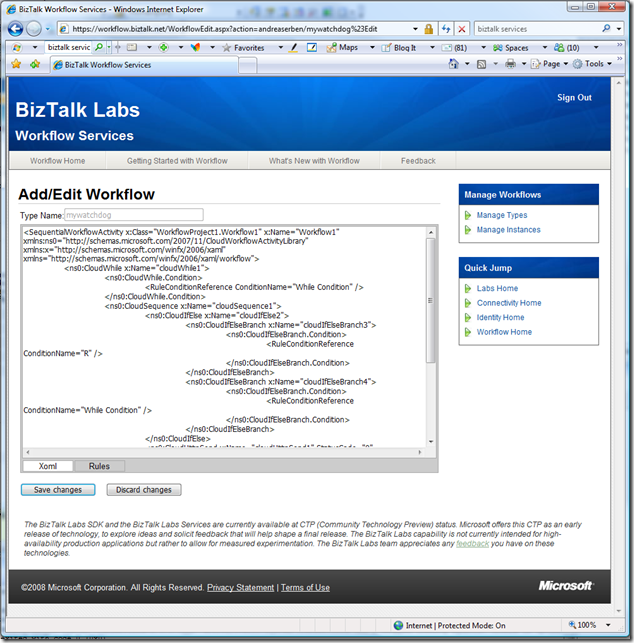
You see that only two tabs are present: Xoml and Rules. This means that the only thing that is uploaded are the XAML (.xoml) and including the rules definitions of your workflow. With other words - no code-behind/developer defined partial C# classes!
Typically you would just copy/paste your relevant XAML (XOML) and rules here.
In "Type Management" you can also "Create Instances". Doing that will add an instance to the "Manage Instance" page:

You could start an instance (if it is in a startable state) by selecting it and then clicking "Start". Note that when you see an instance that displays "Terminated" and the termination was because of an exception, then you can actually click on the link behind the word "Terminated" to get the top-level exception that caused the Workflow to terminate.
But what can you actually do with the Workflow Services right now? Remember, you are running them in the "cloud". And if you could do just anything, this could result in the whole platform getting vulnerable. So what Microsoft did was, to limit the types of activities you can run in the "cloud".
Right now those activities are:
- CloudDelay
- CloudHttpReceive
- CloudHttpSend
- CloudIfElse (and CloudIfElseBranch)
- CloudSequence
- CloudServiceBusSend
- CloudWhile
This is a severely limiting subset of Workflow activities.
If you do not limit yourself to those activities, e.g. by adding something like
<DelayActivity TimeoutDuration="00:00:00" x:Name="delayActivity1" />
to your XOML, you will get "The workflow failed validation" when trying to save your changes.´
Now let's look at the workflow again in Visual Studio. I use Visual Studio 2008, the samples are made for Visual Studio 2005 with the Visual Studio 2005 Extensions for .Net Framework 3.0 (Windows Workflow Foundation).
We are working with Program Files\Microsoft BizTalk Services SDK\Samples\Workflow\GettingStarted now again.
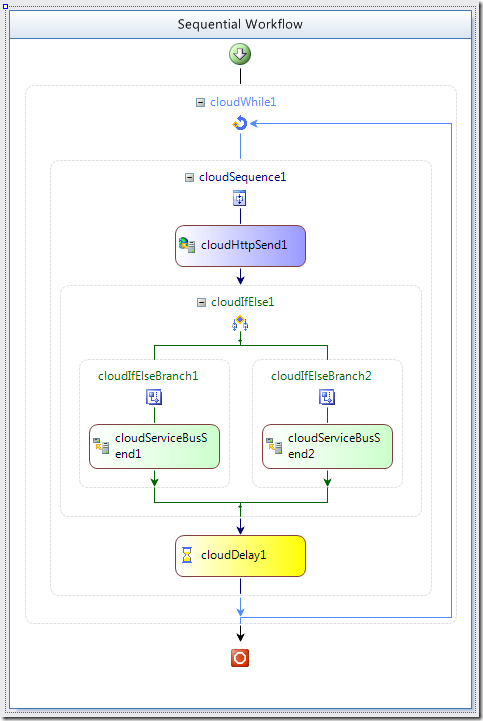
Your workflow should look like this:
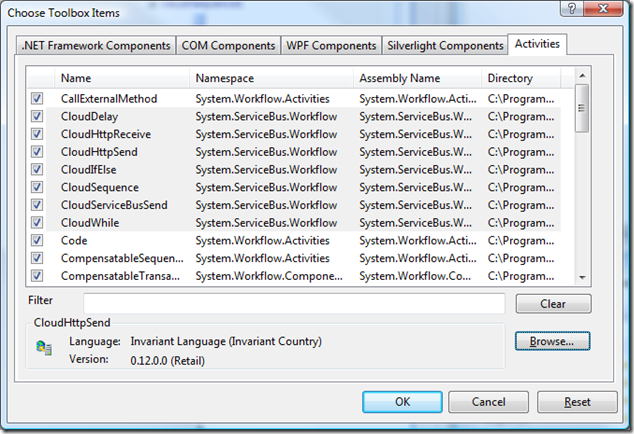
Open in the Menu Tools / Choose Toolbox Items... or select Choose Items... directly in the context-menu when right-clicking in the toolbox. In this window go to the tab "Activities".

The click "Browse..." and select the DLL "System.ServiceBus.Workflow.dll" in Program Files\Microsoft BizTalk Services SDK\Assemblies and choose "OK".
You should see something like that.
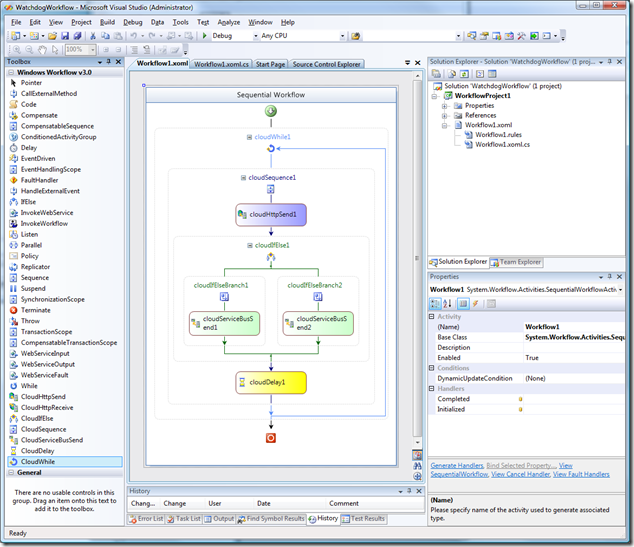
Select "OK" again and your toolbox should see some new activities at the bottom of the list.

And your project should look similar to this.
Now you are basically ready to build your own cloud-hosted workflows.
I think it is worth noting, that the workflow is at the root-level still a regular SequentialWorkflowActivity as seen in the code (which is however not used in the cloud but still it is still there in the project file. Do not put logic here. :) ):
public partial class Workflow1 : SequentialWorkflowActivity
{
}
and more importantly in the root node of the XAML:
<SequentialWorkflowActivity x:Class="WorkflowProject1.Workflow1" x:Name="Workflow1" xmlns:ns0="clr-namespace:System.ServiceBus.Workflow;Assembly=System.ServiceBus.Workflow, Version=0.12.0.0, Culture=neutral, PublicKeyToken=31bf3856ad364e35" xmlns:x="http://schemas.microsoft.com/winfx/2006/xaml" xmlns="http://schemas.microsoft.com/winfx/2006/xaml/workflow">
When looking at the rules, you will further notice that the rules have nothing cloud-specific besides of accessing the cloud-specific activities.
The next posts will look closer at the new activities and at some of the inner workings of the samples, we will further try to stretch what can be done.
Posted
Aug 05 2008, 12:44 PM
by
Andreas Erben
Filed under: .NET 3.0, VS 2005, Visual Studio 2005, BizTalk, BizTalk Server, .NET, Visual Studio 2008, VS 2008, .NET 3.5, BPM, Workflow, WF, Windows Workflow Foundation, SOA, Cloud Computing, Cloud, BizTalk Services, Cloud Services