In this blog post, step by step instruction is going to be described in order to prepare clean Windows based machine (virtual) with GPU for deep learning with CNTK, Tensorflow and Keras. Installation of OS is not covered in the post, and this is task is assumed it is already completed.
Preparing the machine
Once you have up and running clean Windows machine, there are several things you should concider:
1. Physical machine with NVIDIA compatible graphics card.
This requirement will provide deep learning frameworks to train models on GPU, which speedups the training process rapidly.
2. Virtual Machine with GPU.
In case you plan to prepare virtual machine, or Azure virtual machine, be aware that (for my knowledge) only Windows Server 2016 based virtual machine recognize GPU card. So if you install Windows 10 or lower version on virtual machine, you will not be able to use GPU for training deep learning models.
3. Azure N-Series VM
In case you plan to select one of Azure virtual machine, only N-series support GPU.
Installation for NVIDIA driver and related stuff
In this blog post only NVIDIA related driver will be described, and no other installation driver will be considered. In case of other driver installation, please refer to related vendor site.
For this blog post, drivers and related stuff for NVIDIA Tesla K80 graphics card will be explained. For other NVIDIA cards the installation process is almost the same.
1. First you have to know what NVIDIA graphics card is installed your machine.
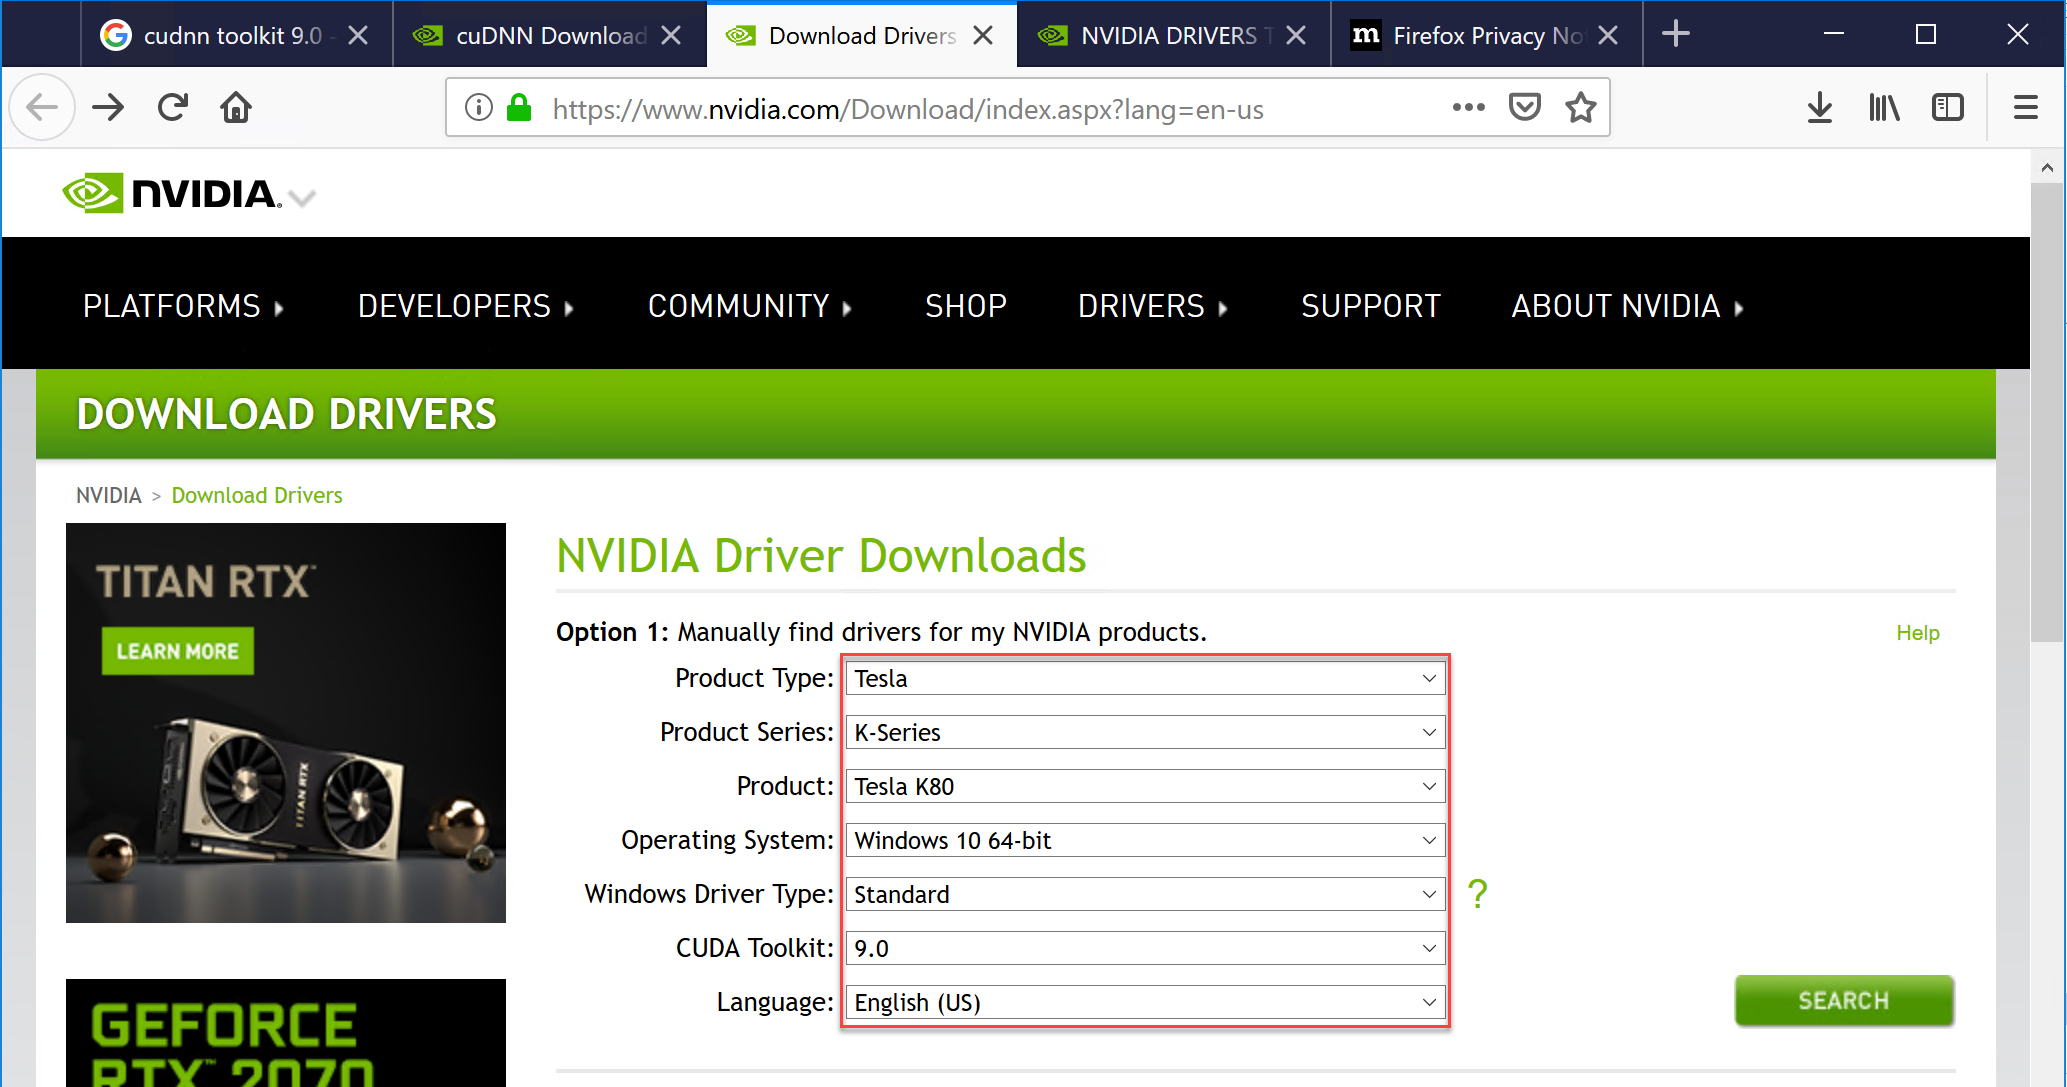
2. Then go to NVIDIA official site, and select appropriate information before driver download. In my case the following information are selected:
3. Press search and download the driver.
Once you download the driver, install it on your machine.
Once you have driver installed, you have to download and install two more NVIDIA software components:
1. CUDA Toolkit 9.0
2. cuDNN 7.4
Those two software components are used by deep learning frameworks (CNTK and TensorFlow) for GPU based computation.
The CUDA 9.0 is compatible with the latest versions of CNTK 2.6 and Tensorflow 1.12, so it makes easier to used one CUDA version for both frameworks, which was not the case in the past.
Installation of CUDA 9.0
In order to install CUDA Toolkit, go to CUDA download page and select appropriate information of your machine. The following information I have selected in order to download it:
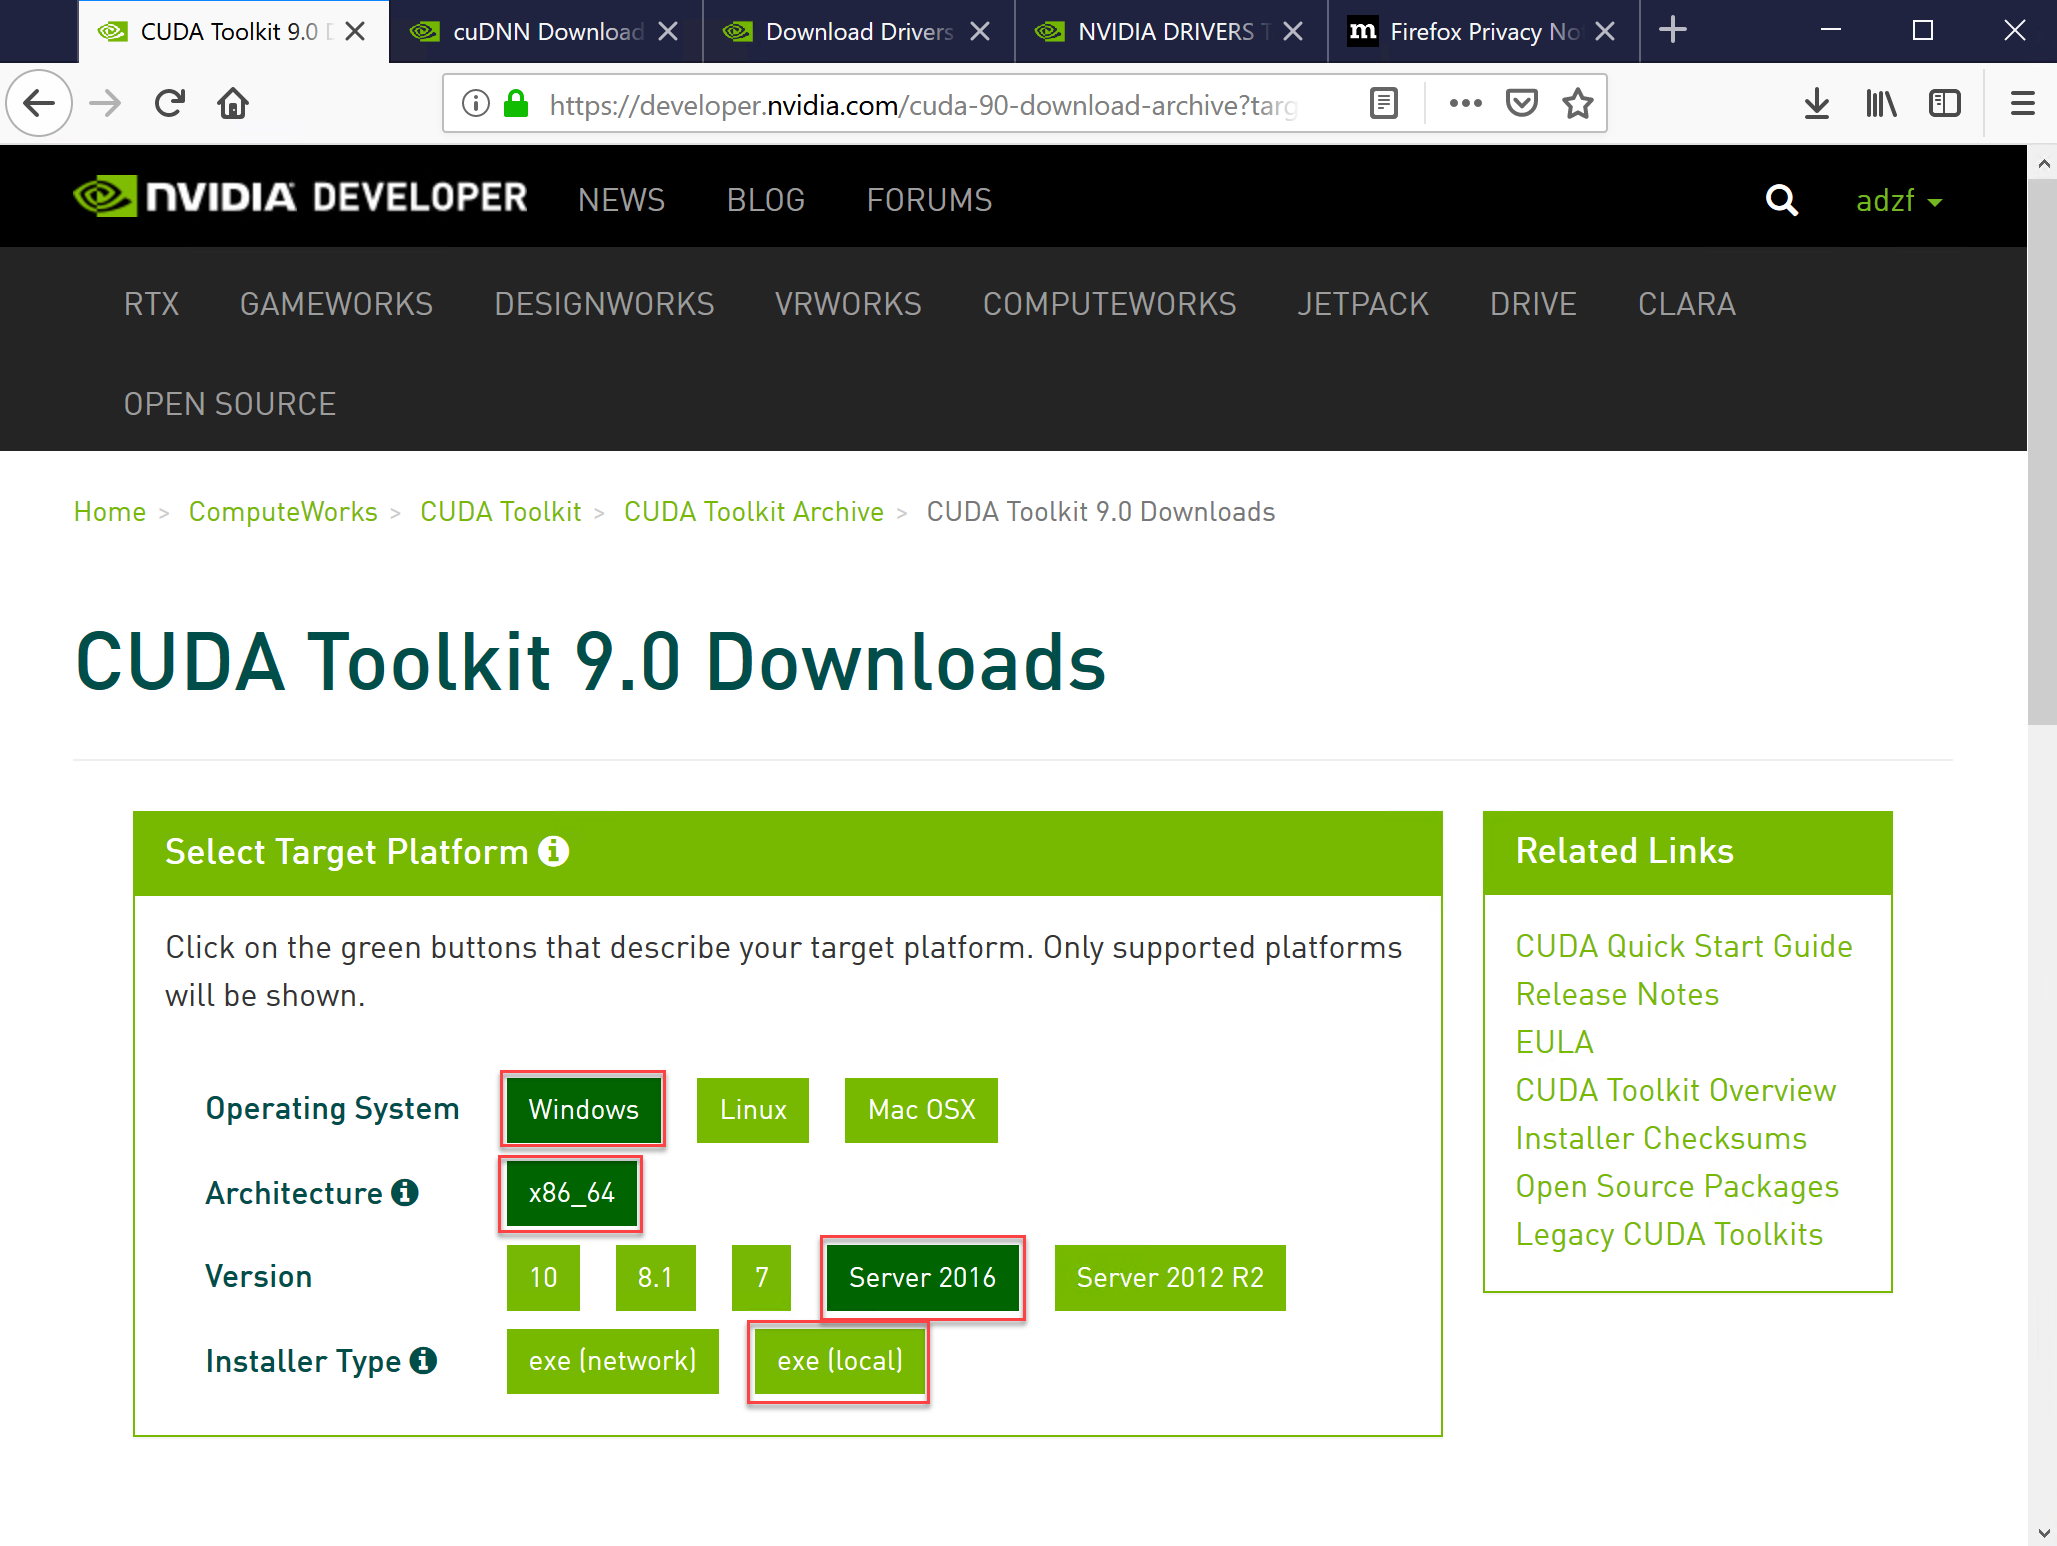
Once you select the right information, press download button. Once the CUDA 9.0 is downloaded on you machine install it by performing Express installation option.
Installation of cuDNN 7.4
Download the cuDNN from the official site, and then press Download cuDNN button.
Once you press it, the following page should appear. Notice also notice that login page might appear before download page.

Once the cuDNN is downloaded unzip it. Only three files are exist in the installation, and those should be copied on the right place. In order to successfully install cuDNN, perform the following files copy:
1. cudnn64_7.dll to C:\Program Files\NVIDIA GPU Computing Toolkit\CUDA\v9.0\bin
2. cudnn.lib to C:\Program Files\NVIDIA GPU Computing Toolkit\CUDA\v9.0\lib\x64
3. cudnn.h to C:\Program Files\NVIDIA GPU Computing Toolkit\CUDA\v9.0\include
Once you've done that, the NVIDIA related stuff installation has been completed, and you can switch to installation Python related stuff.
Installation Python development environment
CNTK and TensorFlow support various python environments, but you should always see official site for the compatibility. In order to use CNTK and Tensor flow on the same python environment, it is recommended to use Anaconda3 version 4.1.1 environment.
First download the Anaconda3 v4.1.1 from the official site:
- Go to http://repo.continuum.io/archive/ and download Anacoda3 4.1.1 for 64 bit.

Once the Anaconda is downloaded install it, on standard way using installer.
Prepare python environment for the installation
Once Anaconda3 4.1.1 has been installed several commands needs to be performed in order to install all necessary software. Before start, we need to upgrade pip since Anaconda3 4.1.1 is little bit old. So run the Anaconda Command Prompt from the Start->Anacoda->Anaconda Prompt
Once the Anaconda Prompt is running, type the following command:
python -m pip install --upgrade pip
Now we are ready to install CNTK, Tensorflow and Keras. But before that we should create separate python environment with python 3.5. Once we have the environment we can install those frameworks to it. The new environment must be relies on python 3.5. So type the following command into Anaconda Prompt:
conda create --name mlenv1218 python=3.5
We have created environment named "mlenv1218".
Now, don't forget to activate the environment before installing software. Type the following commands in order to activate environment.
activate mlenv1218
Once we've done that, the Anaconda Prompt should looks like (active environment is shown on the left site):

Installation of CNTK, Tensorflow and Keras
It is very important to properly install NVIDIA related stuff, before installation of deep learning libraries, because most of the installation problems are related to it. Once we have NVIDIA and Python environment installed properly, the installation process for deep learning frameworks is very easy.
In Anaconda Prompt, with activate "mlenv2118" environment, type the following command in order to install CNTK:
pip install cntk-gpu
The type the following python code to test CNTK installation:
python -c "import cntk; print(cntk.version)"
Once you've done that, type the following command in order to install Tensorflow:
pip install tensorflow-gpu
Type the following command in order to test installation:
python -c "import tensorflow as tf; tf.enable_eager_execution(); print(tf.reduce_sum(tf.random_normal([1000, 1000])))"
At the end type the following command to install Keras:
pip install keras
In addition it is useful to install the following packages:
- matplotlib
- opencv
Those packages are installed using:
pip install matplotlib, and
pip install python-opencv
That is all to install in order to run CNTK, TensorFlow and Keras.
Install Visual Studio Code to write python code
In order to write python code for deep learning you have two options among many other:
- Install Visual Studio 2017
- Install Visual Studio Code
Visual Studio Code can be downloaded from official site. Download it and install. Once you install the VS Code, run it. Press Extension button on the lest side and type python in search box. Select on Python extension and press Install.

- Restart VS Code, and
- Select File->New File
- Save file as python_test.py
- Change current python environment to "mlenv1218" (by double click)
- Run python code, by right click on python code and select "Run Python File in Terminal"
import cntk import tensorflow as tf import keras print("CNTK:",cntk.__version__) print("TensorFlow:",tf.__version__) print("Keras:",keras.__version__)
the following output produced the above code:
