After spending almost two days implementing security in my Web API application with Azure Active Directory and setting up the Swagger on the top and implementing Azure Active Directory via OAuth2 Implicit Grant for it as well, there is definitely some tips and tricks that you should know that will save you at least half of the time implementing the same.
First of all, some important things that you should make sure of:
- You have correctly implemented AAD in your Web API application.
- You have installed and configured (without security of course) Swagger in your Web API application.
- You have set the [Authorize]
Tags on every single Web API Method instead of whole Controller Class. This is important because if you put the Tag for whole Controller Class, Swagger will not recognize those methods as ones that need Authorization and will not render the Login Button (or exactly said Exclamation Mark image) that actually allows you to Login to AAD and come back with valid token.
Add new application to Azure Active Directory for Swagger
Now we should first add a new application to our Azure Active Directory. As of writing this Post, Azure Active Directory UI on latest Azure Management Portal is still not really usable so please use the old Azure Management Portal under https://manage.windowsazure.com/.
So here are the steps you need to do:
- Add new Swagger Application in your Azure Active Directory (I will not explain how to do that in this post and if you already fulfill the requirements above, you already know how to do that). Just write down the Name you gave it. I will reference to it later in text as {nameSwagger}
- Write down the Client ID {clientIdSwagger} of your new application. That is the only thing that you will need. You don't need to create any App/Secret Key etc.
- Add a Reply URL with the "/o2c-html" postfix. Simply said, your Reply URL should be your Swagger URL + "/o2c-html" at the end. It is important as this is the entry point where Swagger returns from AAD after login and reads the token.
- Under "Permissions to other applications", make sure that "Windows Azure Active Directory" hast Application Permissions: "Read directory data" and Delegated Permissions: "Read directory data" and "Sign in and read user profile".
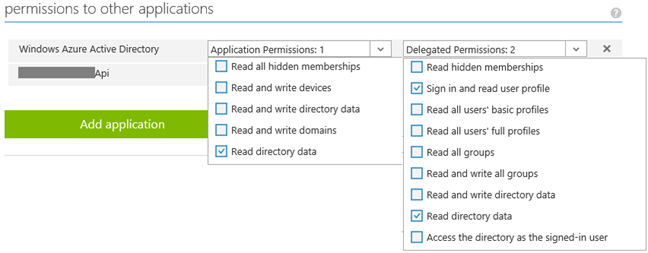
- Under "Permissions to other applications", click on "Add application", change Filter to "All apps" and add your Web API application that Swagger needs to access to. Then make sure that Web API application is now listed and that under Delegated Permissions you check the "Access {webApiAppName}" permission. {webApiAppName} is the name of you Web API application or better said, how you named it in your Azure Active Directory. We will need this parameter as well.

Click on the "Manage Manifest" from the bottom toolbar and then "Download Manifest". Open the JSON file, find the property named "oauth2AllowImplicitFlow" and set it to: "true". Upload the Manifest file back.

- Click on the "View Endpoints" from the bottom toolbar and write down the last endpoint on the list named "OAuth 2.0 Authorization Endpoint". I will reference it later in text as {aadAuthority}.
Check the configuration of your Web API application under Azure Active Directory
Now we need check the configuration for our Web API application definition under Azure Active Directory:
- Write down the App ID URI {appIdUri} of the application.
- Under "Permissions to other applications", make sure that "Windows Azure Active Directory" hast Application Permissions: "Read directory data" and Delegated Permissions: "Read directory data" and "Sign in and read user profile". (Same as above)
Update your SwaggerConfig.cs file to support AAD via OAuth2 Implicit Grant
You can copy paste these lines to your solution. Just make sure you have all parameters I referenced in text with {} correctly set.
In .EnableSwagger Configuration add following lines:
c.OAuth2("oauth2")
.Description("OAuth2 Implicit Grant")
.Flow("implicit")
.AuthorizationUrl({aadAuthority})
.Scopes(scopes =>
{
scopes.Add("user_impersonation", $"Access {appIdUri}");
});
c.OperationFilter<SwaggerOAuth2SecurityRequirements>();
Under .EnableSwaggerUI Configuration add following lines:
c.EnableOAuth2Support(
{clientIdSwagger},
string.Empty,
"http://localhost/", //or where you host your app
{nameSwagger},
" ",
new
Dictionary<string, string> { { "resource", {webApiAppName} } });
And of course the missing SwaggerOAuth2SecurityRequirements.cs class should look like this:
public
class
SwaggerOAuth2SecurityRequirements : IOperationFilter
{
public
void Apply(Operation operation, SchemaRegistry schemaRegistry, ApiDescription apiDescription)
{
// First check if there is any Authorize attribute
var authorizeAttributes = apiDescription.ActionDescriptor.GetCustomAttributes<AuthorizeAttribute>();
if (!authorizeAttributes.Any())
return;
// Create the operation.security property
if (operation.security == null)
operation.security = new
List<IDictionary<string, IEnumerable<string>>>();
// Add the oauth2 security definition to the operation
var oAuthRequirements = new
Dictionary<string, IEnumerable<string>>
{
{ "oauth2", Enumerable.Empty<string>() }
};
operation.security.Add(oAuthRequirements);
}
}
Test your Swagger with new configuration and OAuth2 security
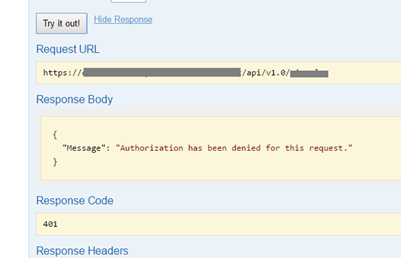
Finally, if you have done everything correctly, you should be able to see the Red Exclamation Mark indicator on the top right corner of every API Method in Swagger. Red color means that you are not authenticated and if you click on "Try it out!" button you should get answer like this:

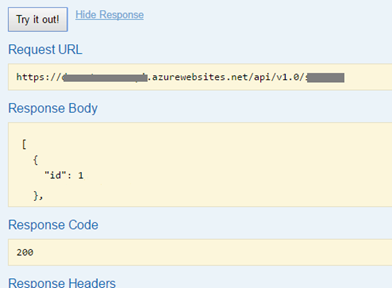
By clicking on the sign, and logging in over Azure Active Directory page, you should get back to Swagger and the Exclamation Mark indicator should turn Blue. After that you will be able to call the method:

Final Words
Swagger is a great tool and I just simply love it! That is why I was willing to take the time and implement the Azure Active Directory security in it simply because I was not willing to give up on such great tool or to compromise by using my development instance without security.
I hope that I have saved you some time!
Posted
Nov 23 2016, 03:40 PM
by
Armin Kalajdzija