
Recently, I was playing with CNTK object detection API, and produced very interesting model which can recognize the Nokia3310 mobile phone. As you probably already know Nokia3310 is legendary mobile phone which was popular 15 years ago, and recently re-branded by Nokia.
In this blog post I will provide you with step by step introductions how to:
- prepare images for training
- generate training data for selected images by using VOOT tool,
- prepare Python code for object detection using FasterRCNN alogirithm implemented with CNTK,
- testing custom image in order to detect Nokia3310 on image.
Preparing Image for model training
Finding appropriate images for our model is very easy. Just go to google.com and type "Nokia3310" and bum, there are plenty of images.

Find at least 20 images, and put into the Nokia3310 image folder. Once we collect enough image for the model, we can move to the next step.
Generating data from the image data set using VOTT tool
In order to train image detection model by using FasterRCNN algoritm, we have to provide three kinds of data separated in three different files:
- class_map file - which contains list of available objects which the model should recognize on the image,
- train_image file - which contains the list of image file paths
- train roi file - which contains "region of interest" data. The data is consisting of list of 4 numbers which represent the top, left, right and bottom coordinate producing rectangle of the object.
-
Open VOTT tool, from File menu and select folder we previously collected with images.
-
Enter "nokia3310" in Labels edit box and click Continue button. In case we have more than one

-
Then for each image, make a rectangle on each object which represents the Nokia3310.
-
Once you finish with tagging for one image, press Next, and do the same for all selected images.

- Once the process of tagging is finished, then the export action can be performed.

- With Export option data is generated for each rectangle we made, and the two files are generated for each image in data set. Also once the tagging process is completed VOTT tool generated three folders:
a) negative - contains images which have no any tagged rectangle (no nokia3310 on images),
b) positive - contains approximate 70% of all images which we tagged Nokia3310 object, and this folder will be used for training the model,
c) testImages - contains approximate 30% of all images which we tagged Nokia3310 object, and this folder will be used for evaluation and testing the model.
The VOOT classified all images in three folders. In case there are images with no tagging, images will be moved to negatives, all other images is separated into positive and testImages folder.
From each image two files are generated:
-[imagename].bboxes.labels.tsv - which consist of all labels tagged in image file.
-[imagename].bboxes.tsv - rectangle coordinates of all tags in the image.
Processing VOTT generated data into CNTK training and testing dataset files
Once we have VOTT generated data, we need to transform them into cntk format. First we will generate: class_map file.txt.
- Create new "class_map file.txt" file, and put the following text into it:
__background__	0
Nokia3310	1
As can be seen there is only one class which we want to detect, and ti is Nokia3310, (the backgroud is reserved tag which is added by default and cannot be removed). Now we need to generate the second file:
8. Create new "train_image_file.txt" file, and put text similar with this one:
0 positive/img01.jpg 0
1 positive/img05.jpg 0
2 positive/img10.jpg 0
...
The content of the file is list of all images placed in positive folder, with ID on the left side and zero on the right side, separated by tabulator. Image path should be relative.
9. Create new "train_roi_file.txt", and put data similar with this one:
0 |roiAndLabel 0	10	418	340 1
1 |roiAndLabel 631	75	731	298 1
2 |roiAndLabel 47	12	222	364 1
3 |roiAndLabel 137	67	186	184 1 188	69	234	180 1
...
As can be seen blue text is rectangle coordinate, which folow the red number indicates classValue. Since we have only one class 1 is always after 4 blue numbers. Also in case image contains more than one rectangle which is the case of line 3, after every four blue numbers it goes class value.
This is procedure how can we make three files for training, needed to run CNTK object detection. Also for testing data we need image and roi files. WHole dataset and coresponded files can be found on GitHub page.
Implementation of Object Detection
CNTK comes with example how to implement object detection which can be found at: https://github.com/Microsoft/CNTK/tree/master/Examples/Image/Detection
So I took the source code from there, and modify it for my case, and published at git hub which can be found here.
-
Before downloading source code, be sure the CNTK 2.3 is installed on your machine with Anaconda 4.1.1, in the environment with Python 3.5 version.
-
Clone the Github repository https://github.com/bhrnjica/ObjectDetection and open it in Visual Studio or Visual Studio Code.
-
First thing you should do is to download pre-trained "Alex net" model. You can easily download it, by running the download_model.py python code placed in PretrainedModels folder.
-
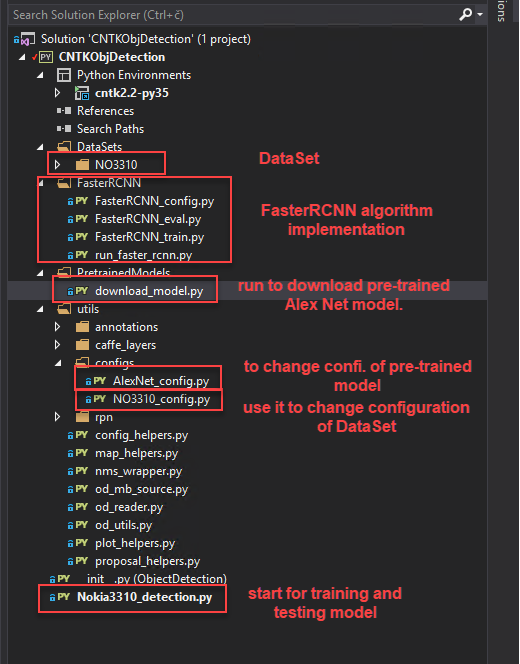
Process of training is started when you run Nokia3310_detection.py python file. Beside pre-trained model, no other resources are required in order to run the project. The folowing picture shows main parts of the solution.
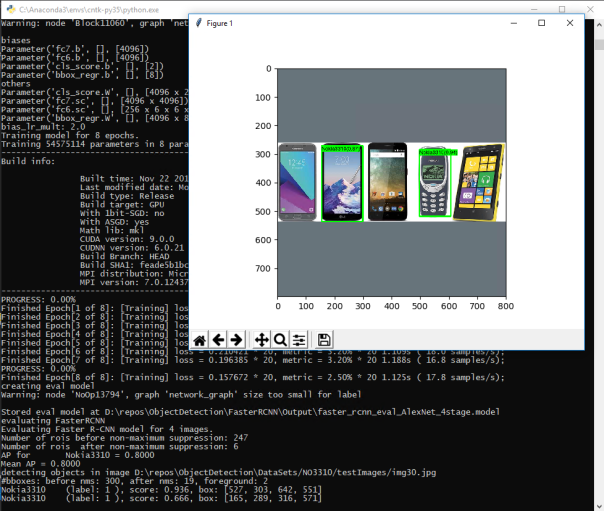
Once the training process is finished, once image is evaluated and shown in order to evaluate how model is good in detecting the phone. Such image is shows at the beginning of the blog post.
All source code with image dataset you can download from GitHub at https://github.com/bhrnjica/ObjectDetection