I have been playing around with Cognitive Services since sometime now, as I find them mind blowing APIs to do a lot of Artificial Intelligence tasks without spending much time building AI algorithms yourself. Take FACE API for example. Normally the most common way to do face detection/recognition is to use Eigenface classification algorithm. For this you need to know basics of AI such as Regression and Classification, as well as basics of algorithms such as SVD, Neural Networks and so on. Even if you use a library such as OpenCV, you still need some knowledge of Artificial Intelligence to make sure you use the correct set of parameters from the library.
Cognitive Services however, make this demand completely obsolete and put the power of AI truly in the hands of common developer. You don’t need to learn complicated mathematics to use the AI tools anymore. This is good because as AI becomes more and more common in software world, it should also be accessible to the lowest common denominator of developers world who might not have the high degrees in science and mathematics, but who know how to code. The downside of it? The APIs are somewhat restricted in what they can do. But this might change in future (Or, so we should hope for).
Today I am going to talk about Using the Face Api from Microsoft Azure Cognitive Services, to build a simple UWP application that can tell some of the characteristics of a face (Such as age, emotion, smile, facial hair etc.)
To do so, first open Visual Studio –> Create New Project –> Select Windows Universal Blank App. This is your UWP application. To use Azure Cognitive Services in this project you would have to do two things.
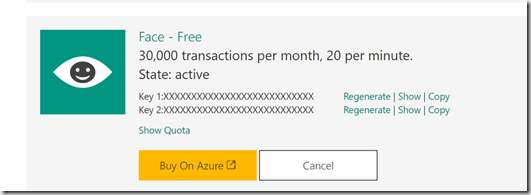
1. Subscribe to Face API in Azure Cognitive Services portal – To do so, go to Cognitive Services Subscription, log on with your account, and Face API. Once you do, you will see following

You will need the key from here later in the code to subscribe to Face API client.
2. Go To Solution Explorer in Visual Studio –> Right Click on Project –> Manage Nuget Packages –> Search for Microsoft.ProjectOxford.Face and Install it. Then in MainPage.xaml.cs, add following lines of code at the top -
1: using Microsoft.ProjectOxford.Face;
2: using Microsoft.ProjectOxford.Face.Contract;
3: using Microsoft.ProjectOxford.Common.Contract;
Now you are all set to create the Universal App for Face Detection using Cognitive Services.
To do so, you need to do following things -
1. Access the device camera
2. Run the camera stream in the app
3. Capture the image
4. Call Face API.
We will look into them one by one.
First, let us access the camera and start streaming the video in the app. To do so, in MainPage.xaml add CaputreElement. See the following code snippet -
1: <CaptureElement Name="PreviewControl" Stretch="Uniform" Margin="0,0,0,0" Grid.Row="0"/>
Then create a Windows.Media.Capture.MediaCapture object and initialize it. Add this as a source to CaptureElement and call the StartPreviewAsync() method. Following code snippet might make it clearer
1: try
2: {
3: m_mediaCapture = new MediaCapture();
4: await m_mediaCapture.InitializeAsync();
5:
6: m_displayRequest.RequestActive();
7: DisplayInformation.AutoRotationPreferences = DisplayOrientations.Landscape;
8:
9: PreviewControl.Source = m_mediaCapture;
10: await m_mediaCapture.StartPreviewAsync();
11: m_isPreviewing = true;
12: }
13: catch(Exception ex)
14: {
15: //Handle Exception
16: }
This will start video streaming from the camera in your application. Now to capture the image and process it, create a button in MainPage.xaml, and add a event handler to this button. In the event handler, call the FaceServiceClient that you should initialize in the initializing code of your app.
1: FaceServiceClient fClient = new FaceServiceClient("Here your subscription key");
And then, use this InMemoryRandomAccessStream object to capture the Photo in JPG encoding and then call DetectAsync from the FaceServiceClient to get the information about faces.
1: using (var captureStream = new InMemoryRandomAccessStream())
2: {
3: await m_mediaCapture.CapturePhotoToStreamAsync(ImageEncodingProperties.CreateJpeg(), captureStream);
4: captureStream.Seek(0);
5: var faces = await fClient.DetectAsync(captureStream.AsStream(), returnFaceLandmarks: true, returnFaceAttributes: new FaceAttributes().GetAll());
6: };
returnFaceLandmarks and returnFaceAttributes are two important properties that you need to take care of in order to get the full Detect information from the API. When returnFaceLandmarks is set to true, you get all the information of location of your face parts such as Pupils, Nose, Mouth and so on. The information that comes back looks like following
1: "faceLandmarks": {
2: "pupilLeft": {
3: "x": 504.4,
4: "y": 202.8
5: },
6: "pupilRight": {
7: "x": 607.7,
8: "y": 175.9
9: },
10: "noseTip": {
11: "x": 598.5,
12: "y": 250.9
13: },
14: "mouthLeft": {
15: "x": 527.7,
16: "y": 298.9
17: },
18: "mouthRight": {
19: "x": 626.4,
20: "y": 271.5
21: },
22: "eyebrowLeftOuter": {
23: "x": 452.3,
24: "y": 191
25: },
26: "eyebrowLeftInner": {
27: "x": 531.4,
28: "y": 180.2
29: },
30: "eyeLeftOuter": {
31: "x": 487.6,
32: "y": 207.9
33: },
34: "eyeLeftTop": {
35: "x": 506.7,
36: "y": 196.6
37: },
38: "eyeLeftBottom": {
39: "x": 506.8,
40: "y": 212.9
41: },
42: "eyeLeftInner": {
43: "x": 526.5,
44: "y": 204.3
45: },
46: "eyebrowRightInner": {
47: "x": 583.7,
48: "y": 167.6
49: },
50: "eyebrowRightOuter": {
51: "x": 635.8,
52: "y": 141.4
53: },
54: "eyeRightInner": {
55: "x": 592,
56: "y": 185
57: },
58: "eyeRightTop": {
59: "x": 607.3,
60: "y": 170.1
61: },
62: "eyeRightBottom": {
63: "x": 612.2,
64: "y": 183.4
65: },
66: "eyeRightOuter": {
67: "x": 626.6,
68: "y": 171.7
69: },
70: "noseRootLeft": {
71: "x": 549.7,
72: "y": 201
73: },
74: "noseRootRight": {
75: "x": 581.7,
76: "y": 192.9
77: },
78: "noseLeftAlarTop": {
79: "x": 557.5,
80: "y": 241.1
81: },
82: "noseRightAlarTop": {
83: "x": 603.7,
84: "y": 228.5
85: },
86: "noseLeftAlarOutTip": {
87: "x": 549.4,
88: "y": 261.8
89: },
90: "noseRightAlarOutTip": {
91: "x": 616.7,
92: "y": 241.7
93: },
94: "upperLipTop": {
95: "x": 593.2,
96: "y": 283.5
97: },
98: "upperLipBottom": {
99: "x": 594.1,
100: "y": 291.6
101: },
102: "underLipTop": {
103: "x": 595.6,
104: "y": 307
105: },
106: "underLipBottom": {
107: "x": 598,
108: "y": 320.7
109: }
110: }
In faceAttributes properties you should give the FaceAttributeType that you want to have such as following. In my application I created a class from which I return all of them in a list with a method called GetAll().
1: FaceAttributeType.Age,
2: FaceAttributeType.Emotion,
3: FaceAttributeType.FacialHair,
4: FaceAttributeType.Gender,
5: FaceAttributeType.Glasses,
6: FaceAttributeType.HeadPose,
7: FaceAttributeType.Smile
The result will look similar to this
1: "faceAttributes": {
2: "age": 23.8,
3: "gender": "female",
4: "headPose": {
5: "roll": -16.9,
6: "yaw": 21.3,
7: "pitch": 0
8: },
9: "smile": 0.826,
10: "facialHair": {
11: "moustache": 0,
12: "beard": 0,
13: "sideburns": 0
14: },
15: "glasses": "ReadingGlasses",
16: "emotion": {
17: "anger": 0.103,
18: "contempt": 0.003,
19: "disgust": 0.038,
20: "fear": 0.003,
21: "happiness": 0.826,
22: "neutral": 0.006,
23: "sadness": 0.001,
24: "surprise": 0.02
25: }
26: }
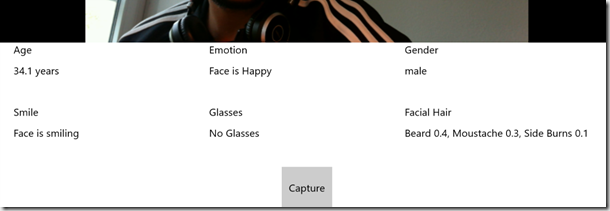
These are float values between 0 and 1 with 1 being maximum and 0 is being least. In my application I wrote a basic threshold method that can display if I am smiling, angry, happy, etc in UI based on these values. The final result looks like this -
 It failed to detect my age (Because when I tested it, I was using a warm light bulb for lighting. Tip: Lighting matters a lot in age detection from Face API. Use cold lights if you want to look younger
  ). But apart from that the other information was quite correct. I was indeed smiling, my face was happy, I wasn’t wearing glasses and have some beard.
At the first look, Face API looks really interesting. You can do a lot with other endpoints of API such as Verification, Identification etc. I would try to cover these other functions in next posts.
Till then.
Posted
May 03 2017, 03:41 PM
by
Indraneel Pole